
Five Ways to Measure Internet Traffic
In my last post, I described basic parameters of Internet connections, and a lightweight setup for measuring those properties. But to understand real equity of access, we need to know not just about the connections that people have, but how they use those connections. This means: the devices they use to access the internet, and how much bandwidth they really consume. Seeing the traffic helps us understand what real-world applications require for daily activities. What Internet connection is needed for equitable participation in public education – with or without a global pandemic? What do students in Chicago Public Schools need? Do current programs meet that need?
The measurement of consumption is a bit trickier than the active measurements described in the last post. Accordingly, this post is yet more technical than the last, though most readers can skip the “implementation” sections. The reason for this complication is that we must intercept the network traffic in some way, in order to measure it. I will present five methods for doing this, each with different costs, strengths, and limitations. Of course, each method allows many viable variants. The methods are:
- Wired hardware: switch mirroring
- Wired hardware: in-line pi or odroid as router
- Wireless hardware: packet sniffing
- Router: OpenWRT or APIs
- Software:
arpspoof
My immediate project is to measure consumption, but these techniques are also applicable to the measurement of application performance. Recent works by the NOISE Lab / Feamster group have used each of these methods, except for wireless hardware.
It is worth emphasizing that this post presents techniques or strategies, and that deploying these in a production context entails greater challenges with regards to security and management.
Some Vocabulary
In common speech, most people use the words router, modem, and wifi interchangeably to describe the box that gives them access to the Internet. The reason for this is that the separate functionalities are usually contained in the same box. But to talk meaningfully about network consumption, we need to use these terms (and a few others), in their technical sense. I want to list these, before diving in.
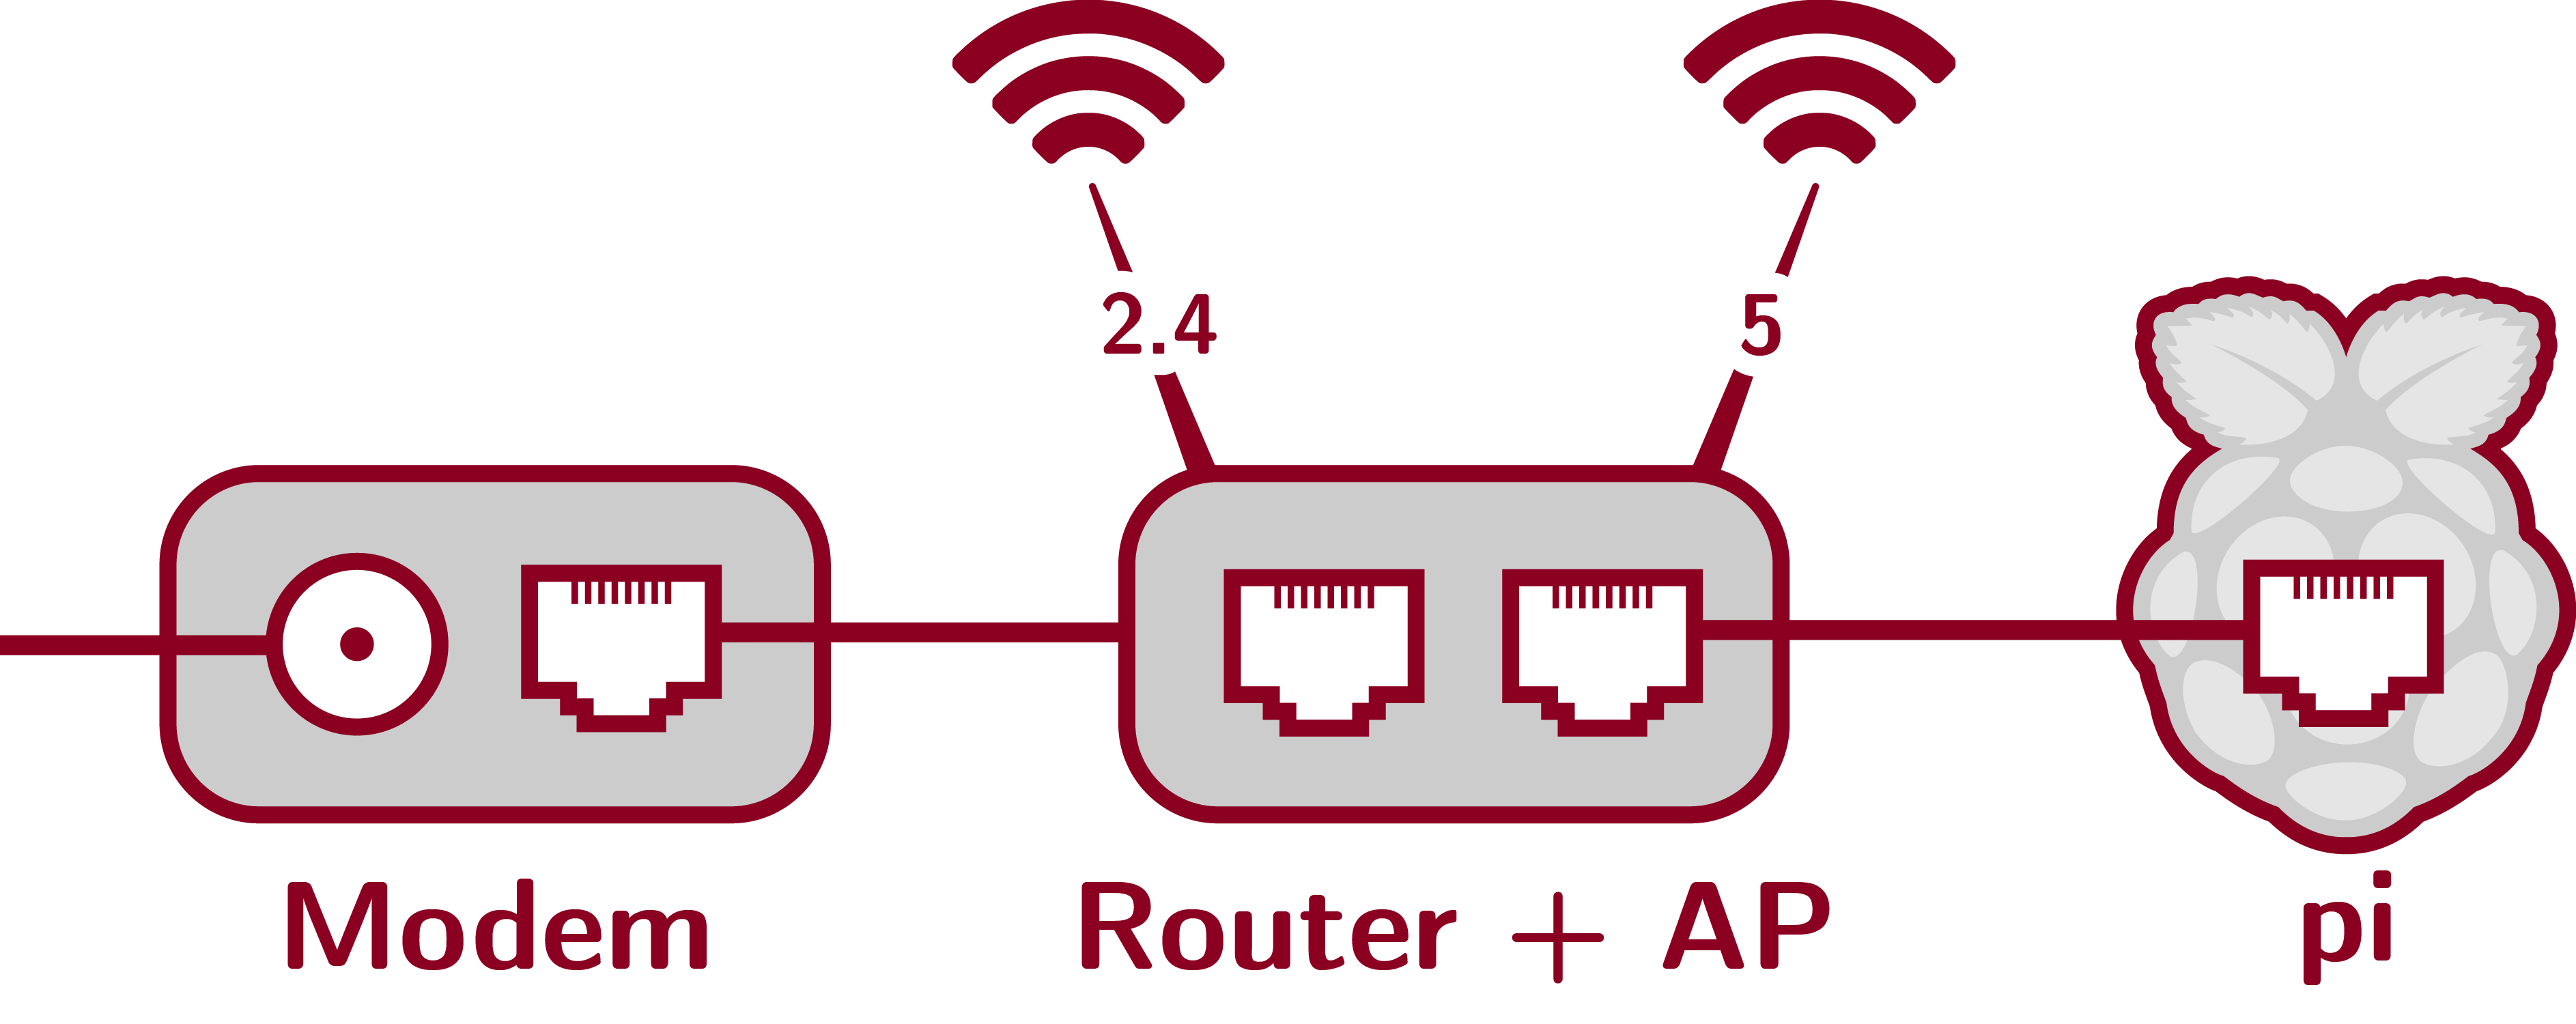
Modem. In practical terms, the modem converts a coaxial “TV” cable into Ethernet. More technically, it converts signals between digital formats (like Ethernet) and ones appropriate for long distance transmission (as on coax), by “modulating” and “demodulating” a carrier wave (whence, “mo-dem”). You can buy modem-only boxes that just take coax in and Ethernet out, but now you can only connect one (wired) computer to the Internet.
Router. A router directs traffic from one network to another. In your home, it accepts the modem’s link to the Wide Area Network (WAN, aka the Internet), and creates a Local Area Network (LAN). It provides physical interfaces (Wifi or Ethernet) that client devices (your computer or phone) can connect to. Critically, it keeps track of who is called what, and where traffic should get sent. It tracks hardware addresses (MAC address), and sends traffic to and from the WAN. Typically, it allocates local IP addresses with DHCP and performs Network Address Translation (NAT) to figure out which physical interface a packet should get sent to.
Access point. The access point (AP) is usually just your home Wifi network. This is often built into the router and modem, but this functionality can also be performed by a separate device. Modern Wifi access points usually operate in two bands of the electromagnetic spectrum allocated by the FCC, at 2.4 and 5 GHz. A separate antenna is required for each of these. If you want to see all Wifi traffic on a network, you’ll need to watch both bands. Within each band are separate channels; the AP can be configured to use a specific channel or choose automatically. If you “listen” on one channel, you will not see the traffic on the other ones.
Switch. A switch copies data from one physical interface to its intended destination. Unlike a router, the switch does not create or manage an IP address space. The functionality that a switch has, that a router typically lacks, is its ability to copy data to another port, where it was not originally intended to go, a process called mirroring. So if we put a switch in the path of our network traffic, we can redirect it to a device we control.
Raspberry pi. In what follows, I will use ‘pi’ as a shorthand for a cheap computer running Linux. A raspberry pi 4 (with an extra Ethernet dongle) can be configured to function as a router, a switch, or even a dual-band wireless access point, all while serving as a flexible and surprisingly powerful computer. If you’re wondering whether you should buy a pi 4, the answer is probably “yes.”
Addresses: IP, MAC, and BSSIDs. Computers address other servers on the Internet by IP address. For your computer, cs.uchicago.edu is just a stable, human-readable mnemonic for the destination 128.135.164.125, that it “looks up” for you on the fly.
Each hardware interface on a device also has a unique name, called a MAC address or BSSID. These addresses are usually static. The router keeps track of the correspondence between these, as well as which hardware address is on which physical interface.
What can we see?
What goes where?
With a standard configuration, a router only sends wired data to its intended recipient. So like the mailboxes in my apartment building, I can’t read everyone else’s mail. To see the traffic at all, we have to redirect it in some way, or place ourselves between source and the destination. Of course, once you blast your data on to Wifi, all bets are off: just as your phone can list available Wifi networks, I can see the traffic that is flying through the air on those networks. I just can’t read that traffic, because it is encrypted.
What is encrypted?
Most Internet traffic is (or should be!) encrypted, but some features are impossible to scrub away: in order to direct data through space, the address needs to be readable. For data travelling on Ethernet (or packed out to the ISP via coax), this means that the destination and source IP address is visible. For packets in the air, en route to or from your Wifi AP, the BSSID of the router and the device are visible. There is no helping that. Even if you hide your Wifi AP, I can still see it broadcasting data.
If you can see the traffic, you can also of course count how big it it is and when it comes – rough measures of consumption. In particular, this means that I could monitor (I don’t, but I could) devices that communicate with my neighbors’ Wifi AP, to count the wireless devices in their household.
However, I can’t see the IP destinations on Wifi traffic (it is encrypted). I don’t know if they prefer Google or DuckDuckGo.
The Methods
The following five sections follow a consistent format. I describe each method in basic terms, and then describe why one might or might not choose that method – its strengths and limitations. A diagram shows how the various components are connected. I list the devices that I used to do this, and their costs (a limitation). Finally, I present the technical steps required to measure network consumption on a home network with this method on a raspberry pi. Those sections are geared to technical readers without apologies.
However, since this post is already long, here’s the short version:
| Method & Cost |
Strengths | Limitations | Device Out of Path? | Potential Bottlenecks |
|---|---|---|---|---|
| Wired: Switch ($400) |
Robust | Lots of equipment to install & configure. | ✔ | None!? |
| Wired: pi as Router ($335) |
Flexible and fewer parts | Security concerns (manageable) Measurement device in infrastructure |
✗ | pi CPU USB Dongle |
| Wireless: sniffing ($408) |
See neighborhood wifi use & spectrum | No IP headers Must hop or monitor channels |
✔ | Just miss the data. |
| Router-based ($390) |
Easy install Direct access to interfaces for data and wireless params |
Changing equipment to measure it! Turris/OpenWRT not super flexible; tshark not available |
✗ | Theoretically none. |
Software: arpsoof($315) |
Cost Can be “turned on” with active measures |
Performance | ✗ | Single link to pi must “double” traffic IP forwarding |
Note that costs include a separate modem and router + access point, which households may currently own as a single box. These devices are not strictly necessary for the software-based method (so long as the router doesn’t have controls on ARP spoofing).
1. Wired hardware: switch mirroring
Use a network switch to copy all user data on our local network to a device that we control (a pi).
Strengths and limitations. This method is extraordinarily robust. It requires lots of hardware, but uses it in ways (mostly) intended by manufacturers, within design specs, and requires basically no command-line work. It is the method that both Nick Feamster and I run at home. All IP traffic to the Internet is visible, so it is easy to create rules to extract data associated with specific services (Zoom, etc.). Note that in this configuration, I do not see internal traffic on the LAN – between two laptops, for instance. But most people don’t do that much, anyway.
Because the traffic is mirrored it will not affect the user’s connection if our measurement device (pi) fails. The Gigabit Ethernet link to the pi has the same capacity as the one from the modem to the router in the first place. That means that the speed that I can process is only really limited by the processing power of the pi or what I want to write to disk. In my experience, my failures usually related to the write speed of the pi’s micro SD card. You could fix this somewhat by working in memory or using an external SSD.
The downside is many moving pieces, which bring expense and inevitable complexity.
Network topology. The network setup is shown below. It is a long series, from modem, to router, to switch, to access point, with the pi hanging off the switch. Since most access points are also routers, you basically need two routers for this setup. The first router controls the entire address space, and it has to be in front of the switch (to the pi).
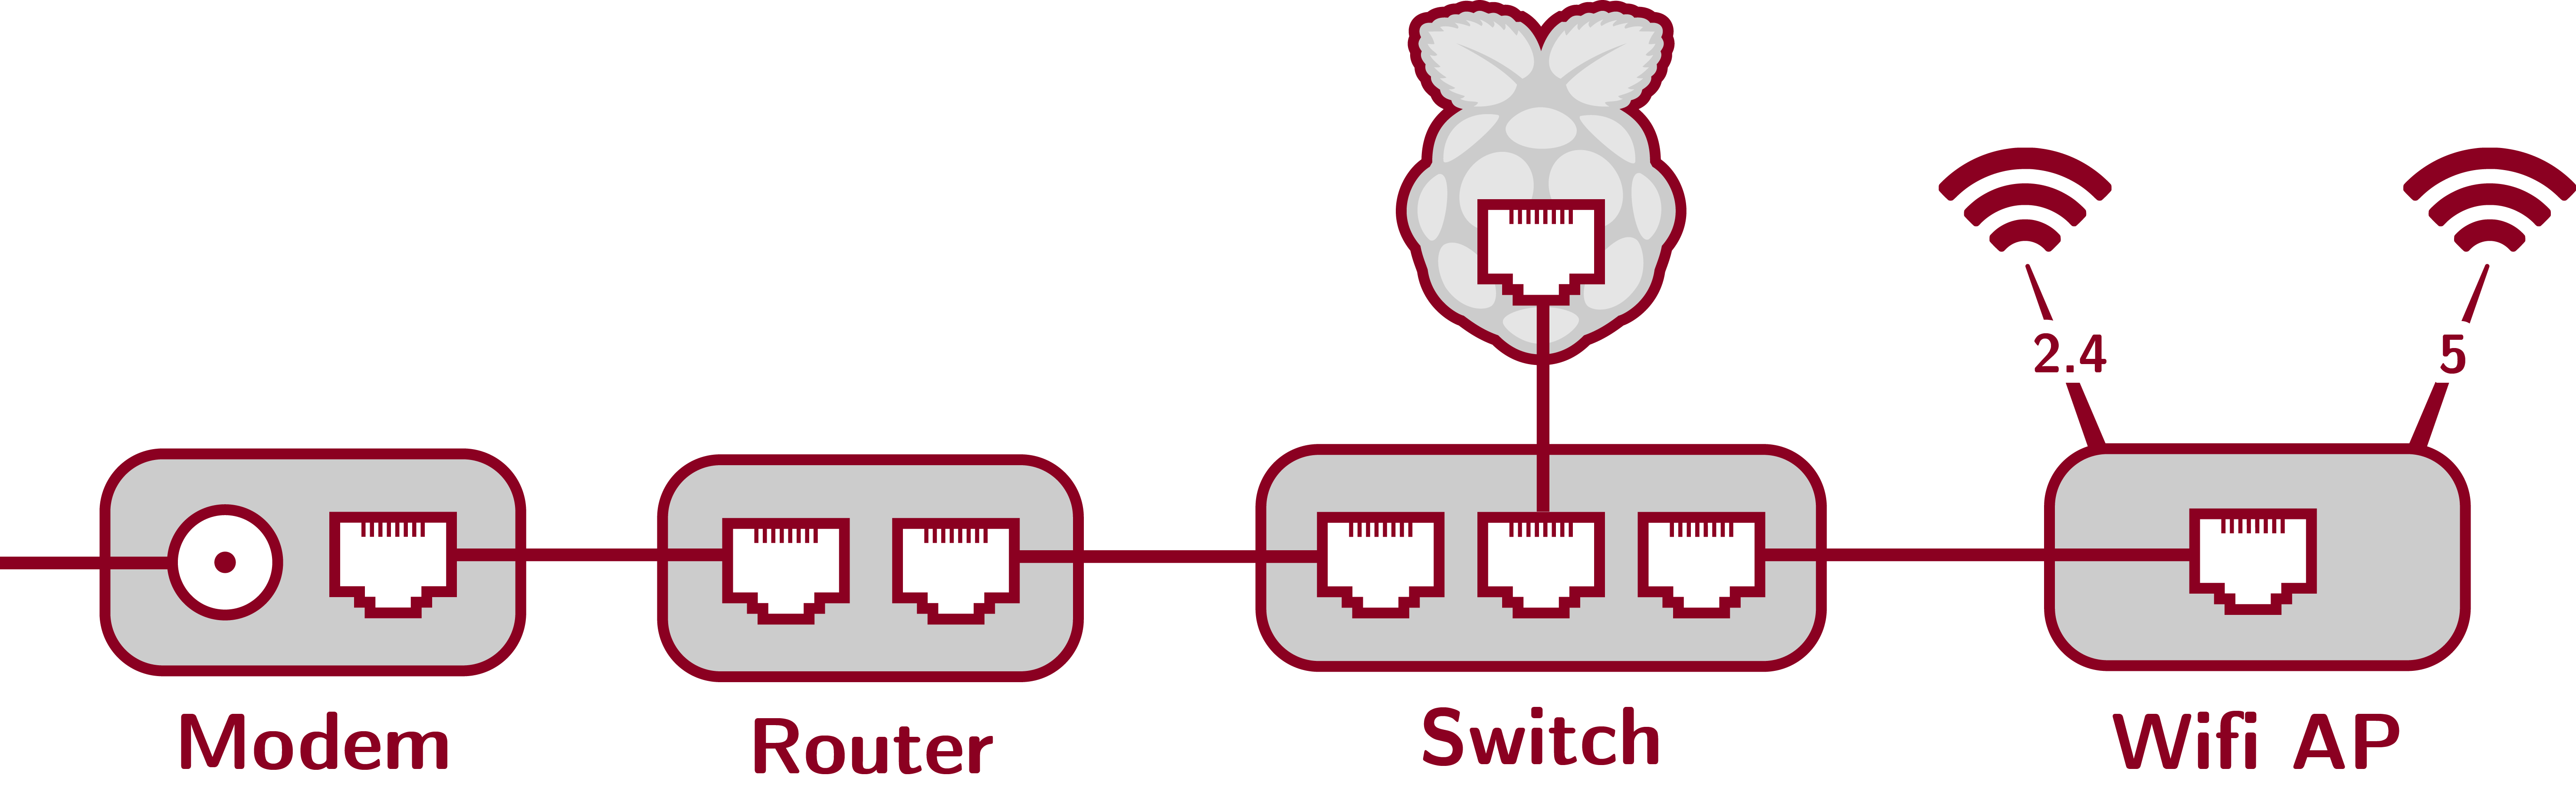
Equipment list and cost. In my setup, I used mostly things that I had “laying around,” personally or from the lab. The total cost of this gear is $445, but you could easily bring this down to about $350 by tuning the RAM on the pi, using a more-appropriate wired router, and a cheaper switch.
- Modem: NETGEAR Cable Modem CM500 ($55). My copy was only good up to 300 Mbps, but I have a 30 Mbps connection at home, so that was fine by me. I think they only sell 680 Mbps+, now. Just be sure that whatever you get is rated way beyond your ISP contract.
- Router: Linksys LRT214 ($85 used). This is a decent VPN router, but it’s just what I happened to have. It seems to have a DNS cache that I could not turn off, which was annoying. If I were buying from scratch, I would have used the TP-Link ($60 new).
- Switch: Netgear GS105Ev2 ($45). Any switch with port mirroring will do.
- pi4: Pi 4 8GB Starter Kit ($120). You probably do need a case and a power supply, so I’d go with a kit. If you need many of these, you might tune the amount of RAM, but if you may use this for a variety of projects, I would max out the RAM (8 GB!!).
- Wifi Access Point: Netgear Nighthawk 6900P ($140). I love this router: we went from having persistent and annoying connection issues on the ARRIS router from Comcast to no issues. The Wifi is usually the weakest link in a home network, so it’s worth investing to get this part right.
Technical implementation. This method is almost “plug and play,” but there are a few tricks.
Out of the box (or after a reset), the switch will set itself to 192.168.0.239, whereas my router sat at 192.168.1.1, and I wanted them on the same /24 subnet. To fix this, connect your laptop directly to the switch. You will have to set a static IP on 192.16.0.0/24 for the interface, which you can do from a Mac as
sudo ipconfig set en7 INFORM 192.168.0.123or from Ubuntu as
sudo ifconfig enx 192.168.0.123 netmask 255.255.255.0Then navigate to the default IP (192.168.0.239) and change the default IP. You will also set up port mirroring, from both the router and the AP to the pi. Do that under System > Monitoring > Mirroring.
The router is used in “access point mode.” I found it quite painful to find this and get it working. The setup wizard for the AP mode made the whole setup virtually unusable several times. Ultimately, I set it up as its own router (on 10.0.0.1) and then changed it afterward to the AP mode. This is at “Advanced > Advanced Settings > Router / AP / Bridge Mode > AP Mode.” I did “Enable fixed IP settings” because it was driving me crazy to nmap to find my router. The Ethernet cable from the switch is plugged into the “Internet” port (not one of the LAN ports).
To keep it easier to find things, I froze the IP address of the pi (find it using nmap). Change /etc/netplan/50-cloud-init.yaml to
network:
  ethernet:
    eth0:
      dhcp4: no
      addresses:
        - 192.168.1.4/24
      gateway4: 192.168.1.1
      nameservers:
        addresses: [8.8.8.8, 1.1.1.1]
  version: 2
And then do
sudo netplan applyTo measure consumption you would then do
tshark -f "not broadcast and not multicast and not (ip src 192.168.1.4 or ip dst 192.168.1.4 or ip src 192.168.1.1 or ip dst 192.168.1.1)" \
-i eth0 -a duration:60 -Q -z io,stat,100 -z conv,ip
I drop everything as a capture filter instead of as a display filter, which could do the same thing. In this case, I am dropping traffic to the pi (192.168.1.4) or the router (192.168.1.1). I didn’t want to write the capture file, because the microSD card can’t handle it, but you could also write this to file. The io,stat,100 is just because io,stat requires an interval, so I make it longer than the duration (60 seconds).
2. Wired hardware: in-line pi or odroid as router
Configure a raspberry pi as the router using iptables, giving you comfortable command-line access to all traffic.
Strengths and limitations. This is a particularly elegant solution. So long the USB can keep up, everything should be Gigabit, and speed should not be an issue I have not tested it up to 1 Gbps, but the pi is pretty powerful. If you also want to be able to do heavy inference, you could add a USB Coral accelerator or use a jetson nano. Since this is a wired set-up, you can see all the IP addresses.
There is always a concern about hosing a subject’s connection, and I haven’t done a long test of reliability. Security is also a big issue on this one, and I’ve made included very brief notes on this, below.
Network topology. The raspberry pi works as a router, which in this case simply means that it creates the address space. Its sole connection within the LAN is to the access point. Still, connecting it in series means two Ethernet connections. It only has one, so we use a USB dongle.
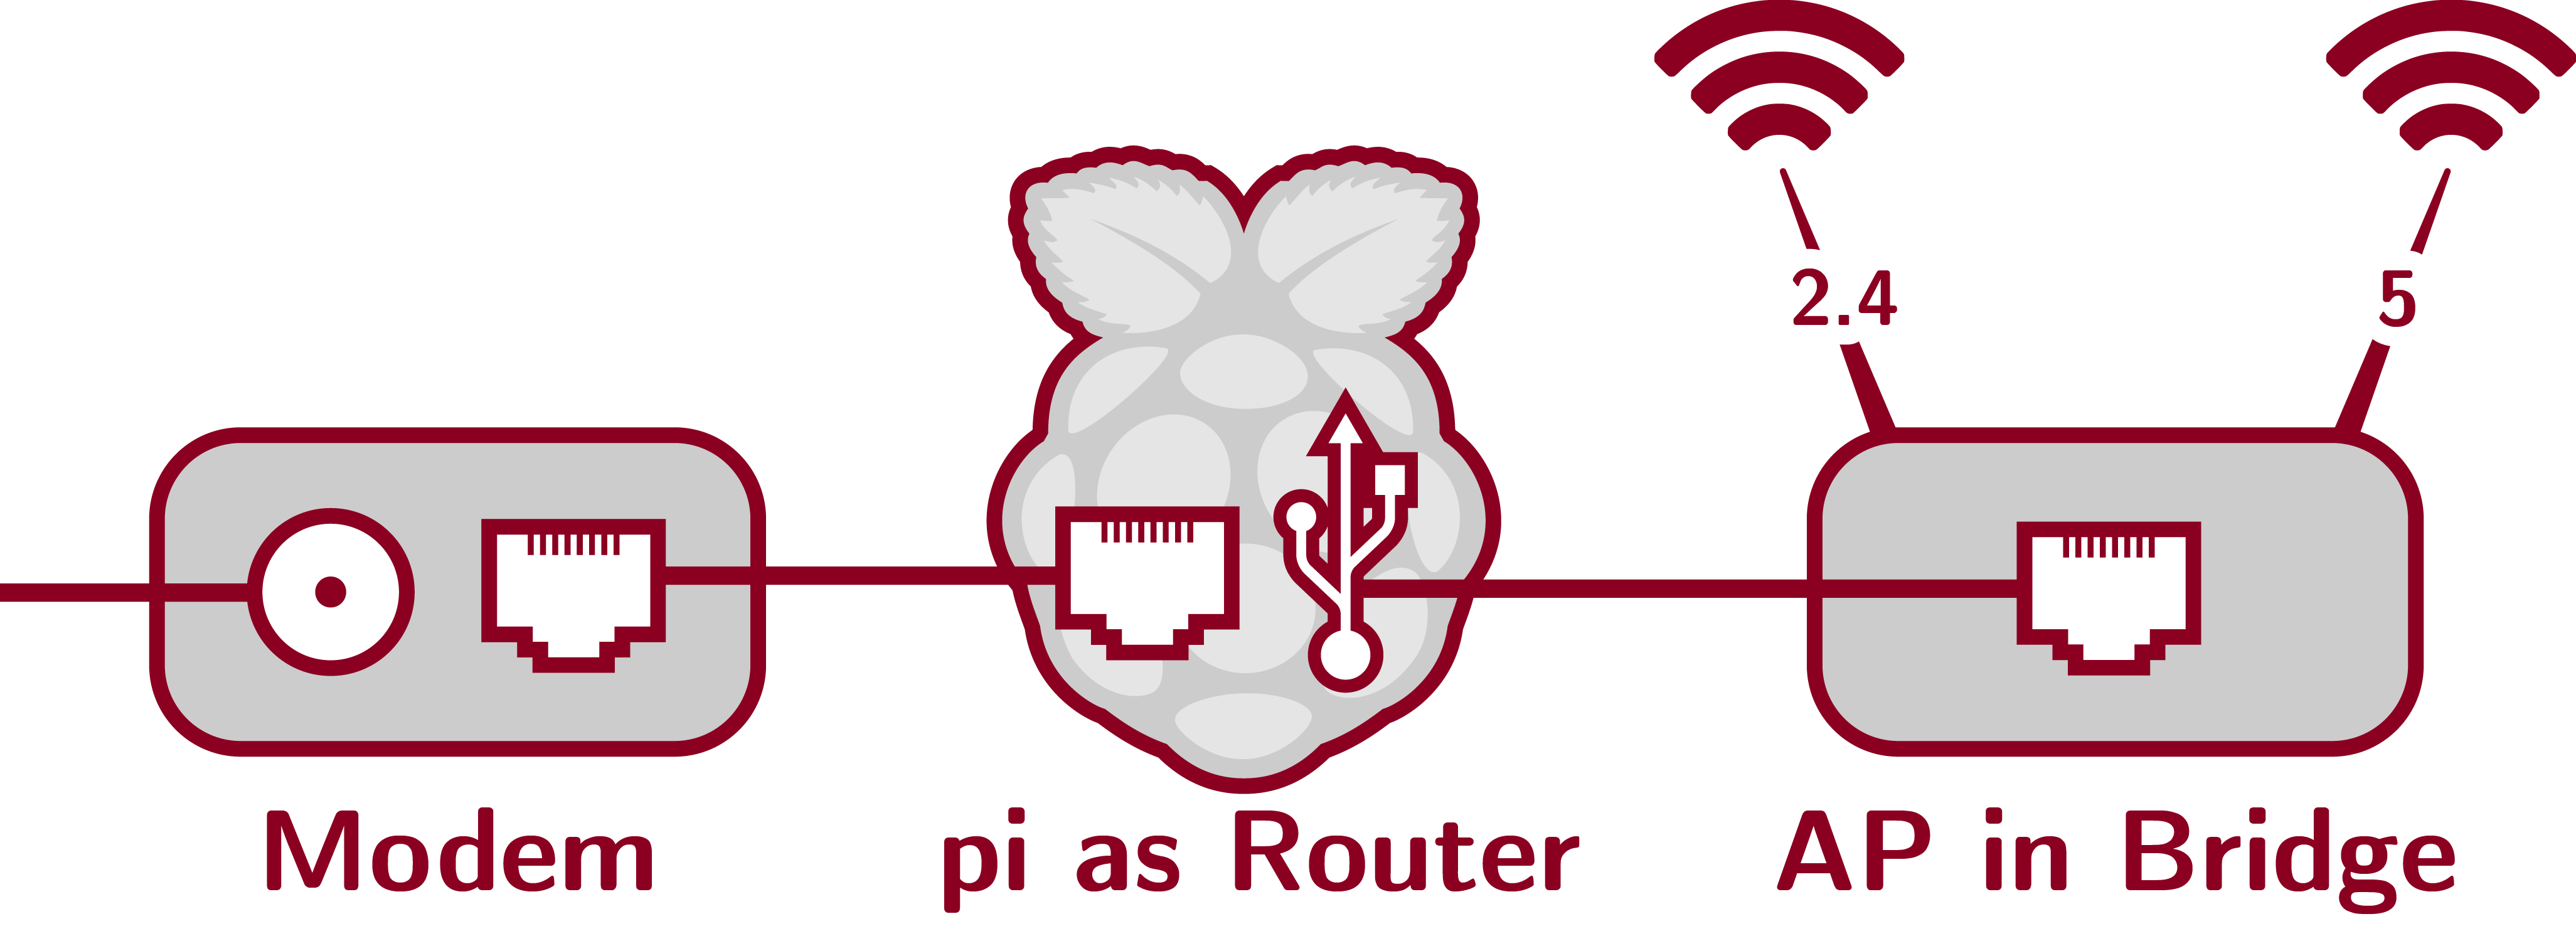
Equipment list and cost. Along with the modem, the pi, and the wireless access point, you’ll need that Gigabit Ethernet dongle for USB 3.0. I used:
The total cost is $335, but if all you need is the pi and the dongle, it’s just $100-$140.
If you just want to play with this, you can bypass the dongle, and turn the pi into both a router and a wireless access point.
Technical implementation. First off, you may want to just check that your Ethernet dongle actually works. Check that it’s there and has appropriate drivers, with lsusb and lsmod:
 ~ lsusb
Bus 002 Device 001: ID 1d6b:0003 Linux Foundation 3.0 root hub
Bus 001 Device 003: ID 0bda:8153 Realtek Semiconductor Corp. RTL8153 Gigabit Ethernet Adapter
Bus 001 Device 002: ID 2109:3431 VIA Labs, Inc. Hub
Bus 001 Device 001: ID 1d6b:0002 Linux Foundation 2.0 root hub
 ~ lsmod | grep -e cdc -e r8152
cdc_ether              20480  0
r8152                  73728  0
So it’s there and the RTL 8152 driver is too. It seems like ifconfig is on the way out, but if we do:
ip addr showwe see that the device is there but DOWN. Since Ubuntu 17, that has meant a visit to netplan. (This is where Raspbian is easier, in my opinion.) Create the additional Ethernet interface among the ethernet in /etc/netplan/50-cloud-init.yaml.
eth1:
  dhcp4: no
  addresses:
    - 192.168.1.144/24
  gateway4: 192.168.1.1
  nameservers:
    addresses: [1.1.1.1, 8.8.8.8]
Here I’m setting a static address on 192.168.1.1/24 to make sure that I’m not crazy, and that I can actually use the dongle. Then do
sudo netplan applyand check your handiwork with
ip addr show eth1So far so good. I can even ssh in.
Now go back and move it off the 192.168.1.1 subnet, to a new static “gateway” address, like 192.168.7.1. Then enable IP forwarding via
sudo sysctl -w net.ipv4.ip_forward=1or alternatively
echo 1 | sudo tee /proc/sys/net/ipv4/ip_forwardTo make this persistent to reboots, make the change in /etc/sysctl.conf:
net.ipv4.ip_forward=1Finally, we need to install dnsmasq and isc-dhcp-server: Before doing that, you should stop systemd-resolvd so that we can run dnsmasq.
systemctl disable --now systemd-resolvedDo make sure you have set a DNS nameserver in /etc/resolv.conf. Now go ahead and install:
sudo apt install -y dnsmasq isc-dhcp-serverTell isc-dhcp-server to mind DHCP requests on your interface, by editing /etc/default/isc-dhcp-server
INTERFACESv4="eth1"Finally, the issues iptables rule to do Network Address Translation (turn port addressing into local IP addresses):
sudo iptables -t nat -A POSTROUTING -o eth0 -j MASQUERADEWowwy-kazowwy! To make this permanent (if you want), save the rule,
sudo sh -c "iptables-save > /etc/iptables.ipv4.nat"and then configure it to run on boot, by adding this to /etc/rc.local
iptables-restore < /etc/iptables.ipv4.natSo run tshark for a victory lap!
tshark -i eth1 -a duration:10Note that these instructions can change a lot between operating systems. The steps above are for Ubuntu Server 20.04, which is not always the friendliest. For example, the method for setting static IP addresses is different on Raspbian – see here.
I should also emphasize that if you set up a pi as a router, you really must manage its security settings. Raspbian now ships with ssh disabled (which is probably a good thing). If you want to be able to contact your device, you should obviously not use default passwords. In addition, you could restrict access in /etc/ssh/sshd_config by setting it the ListenAddress that you will use. You could also turn it towards the local network with AllowUsers you@192.168.1.1/24. And you might change the port (Port) off of 22.
You could do similar things with iptables rules or ufw. But you should definitely do something like this.
3. Wireless hardware: packet sniffing
Use two Wifi devices in monitor mode to sniff for packets on the 2.4 and 5 GHz bands.
Strengths and limitations. One unique appeal to packet sniffing is that you can see traffic outside of your home network. If you live in a city, this means that you can see how people in the neighborhood use the Internet. You can only count wireless devices, but I think most people use Wifi over Ethernet at this point, so I don’t see this as a big limitation. If your antennas are powerful or plentiful, you could get a pretty good sense of how and when different neighborhoods use the Internet.
The downside is that you can’t see where any traffic is going: the addresses that you can read are the BSSIDs of the devices and the access points, not the IP destinations. This is a real limitation for monitoring application performance, though it is probably possible to fingerprint out certain applications, and do a certain amount with timing and flows alone. There is also sometimes a lot of internal traffic, though you can filter some of this (management packets, etc.).
Another challenge is that you have to track which channels to monitor the traffic on. Usually, we would set the packet sniffer to either “hop” from channel to see traffic on each one, or focus on a single channel. Either way, you’re liable to miss traffic. The AP can change which channel it uses (though this is rare), and you need to monitor that somehow; you’ll do that by leaving the fixed channel. Catch-22. And of course, you aren’t guaranteed to receive every packet (it’s not for you). Catch-23.
Network topology. This requires one interface for each wireless band, that can be put into monitor mode.
Equipment list and cost. In addition to the modem, nighthawk router, and pi already listed, I used two wireless dongles from ALFA networks. Including all components, the cost is around $408.
- AWUS036ACH for 5 GHz ($60)
- AWUS036NEH for 2.4 GHz ($33)
Technical implementation. The 5 GHz dongle required me to install the driver from this aircrack-ng repo.
sudo apt-get install dkms
git clone git@github.com:aircrack-ng/rtl8812au.git
cd rtl8812au
sudo make dkms_install
The driver for the 2.4 GHz antenna should be included in the kernel. Then you can set them to monitor and set the channels. Just for clarity, I am taking these channels (11 and 157) as given (I forced them, for this test).
sudo ip link set wlan1 down
sudo ip link set wlan2 down
sudo iw dev wlan1 set type monitor
sudo iw dev wlan2 set type monitor
sudo iwconfig wlan1 channel 11
sudo iwconfig wlan2 channel 157
sudo ip link set wlan1 up
sudo ip link set wlan2 up
Note that some programs will over-ride the channel. I ultimately decided against Kismet, because I did not want to record the data. But I did test with it, and to do this, I set the relevant lines in my /etc/kismet/kismet.conf to
ncsource=wlan1:name=a2,hop=false,channel=11
ncsource=wlan2:name=a5,hop=false,channel=157
(You may also need to do airmon-ng check kill, to get things running smoothly.)
Anyway, you can then watch for data to and from the 2.4 and 5 GHz interfaces on your access point via:
tshark -f "not broadcast and not multicast and (wlan src MY:24:MA:CA:AD:DR || wlan src MY:50:MA:CA:AD:DR || wlan dst MY:24:MA:CA:AD:DR || wlan dst MY:50:MA:CA:AD:DR)" -i wlan1 -i wlan2 -a duration:10Just for kicks, note that you could do similar things with display filters, tossing out any data headed to the pi itself. Then watch for wlan conversations.
tshark -i wlan1 -f "not broadcast and not multicast" \
       -i wlan2 -f "not broadcast and not multicast" \
       -a duration:100 -Q -z conv,wlan,'wlan.fc.type == 2 && wlan.sa != th:em:ac:ad:dr:pi && wlan.da != th:em:ac:ad:dr:pi && other requirements ...'
Personally, I was so surprised at data headed to my Chromecast, that I unplugged it.
4. Router: OpenWRT or APIs
Strengths and limitations. So simple to get started! Out of the box, you have almost all the working parts. The downside is that OpenWRT is not the easiest or most flexible environment, and the Turris equipment is quite expensive.
In addition, the Turris was probably not your router when you started, so you may be changing your home network in order to measure it. That’s fine for consumption, but not great for other performance measures.
I investigated using the OpenWRT on my existing home router (the Netgear Nighthawk 6900P), but it seems OpenWRT doesn’t play nice with proprietary drivers for the Broadcom chips. I need my network to actually function, so this was out. It might work with the DD-WRT ~fork, but I didn’t push this.
Network topology. The OpenWRT is connected directly to the cable modem, just like any other normal router.
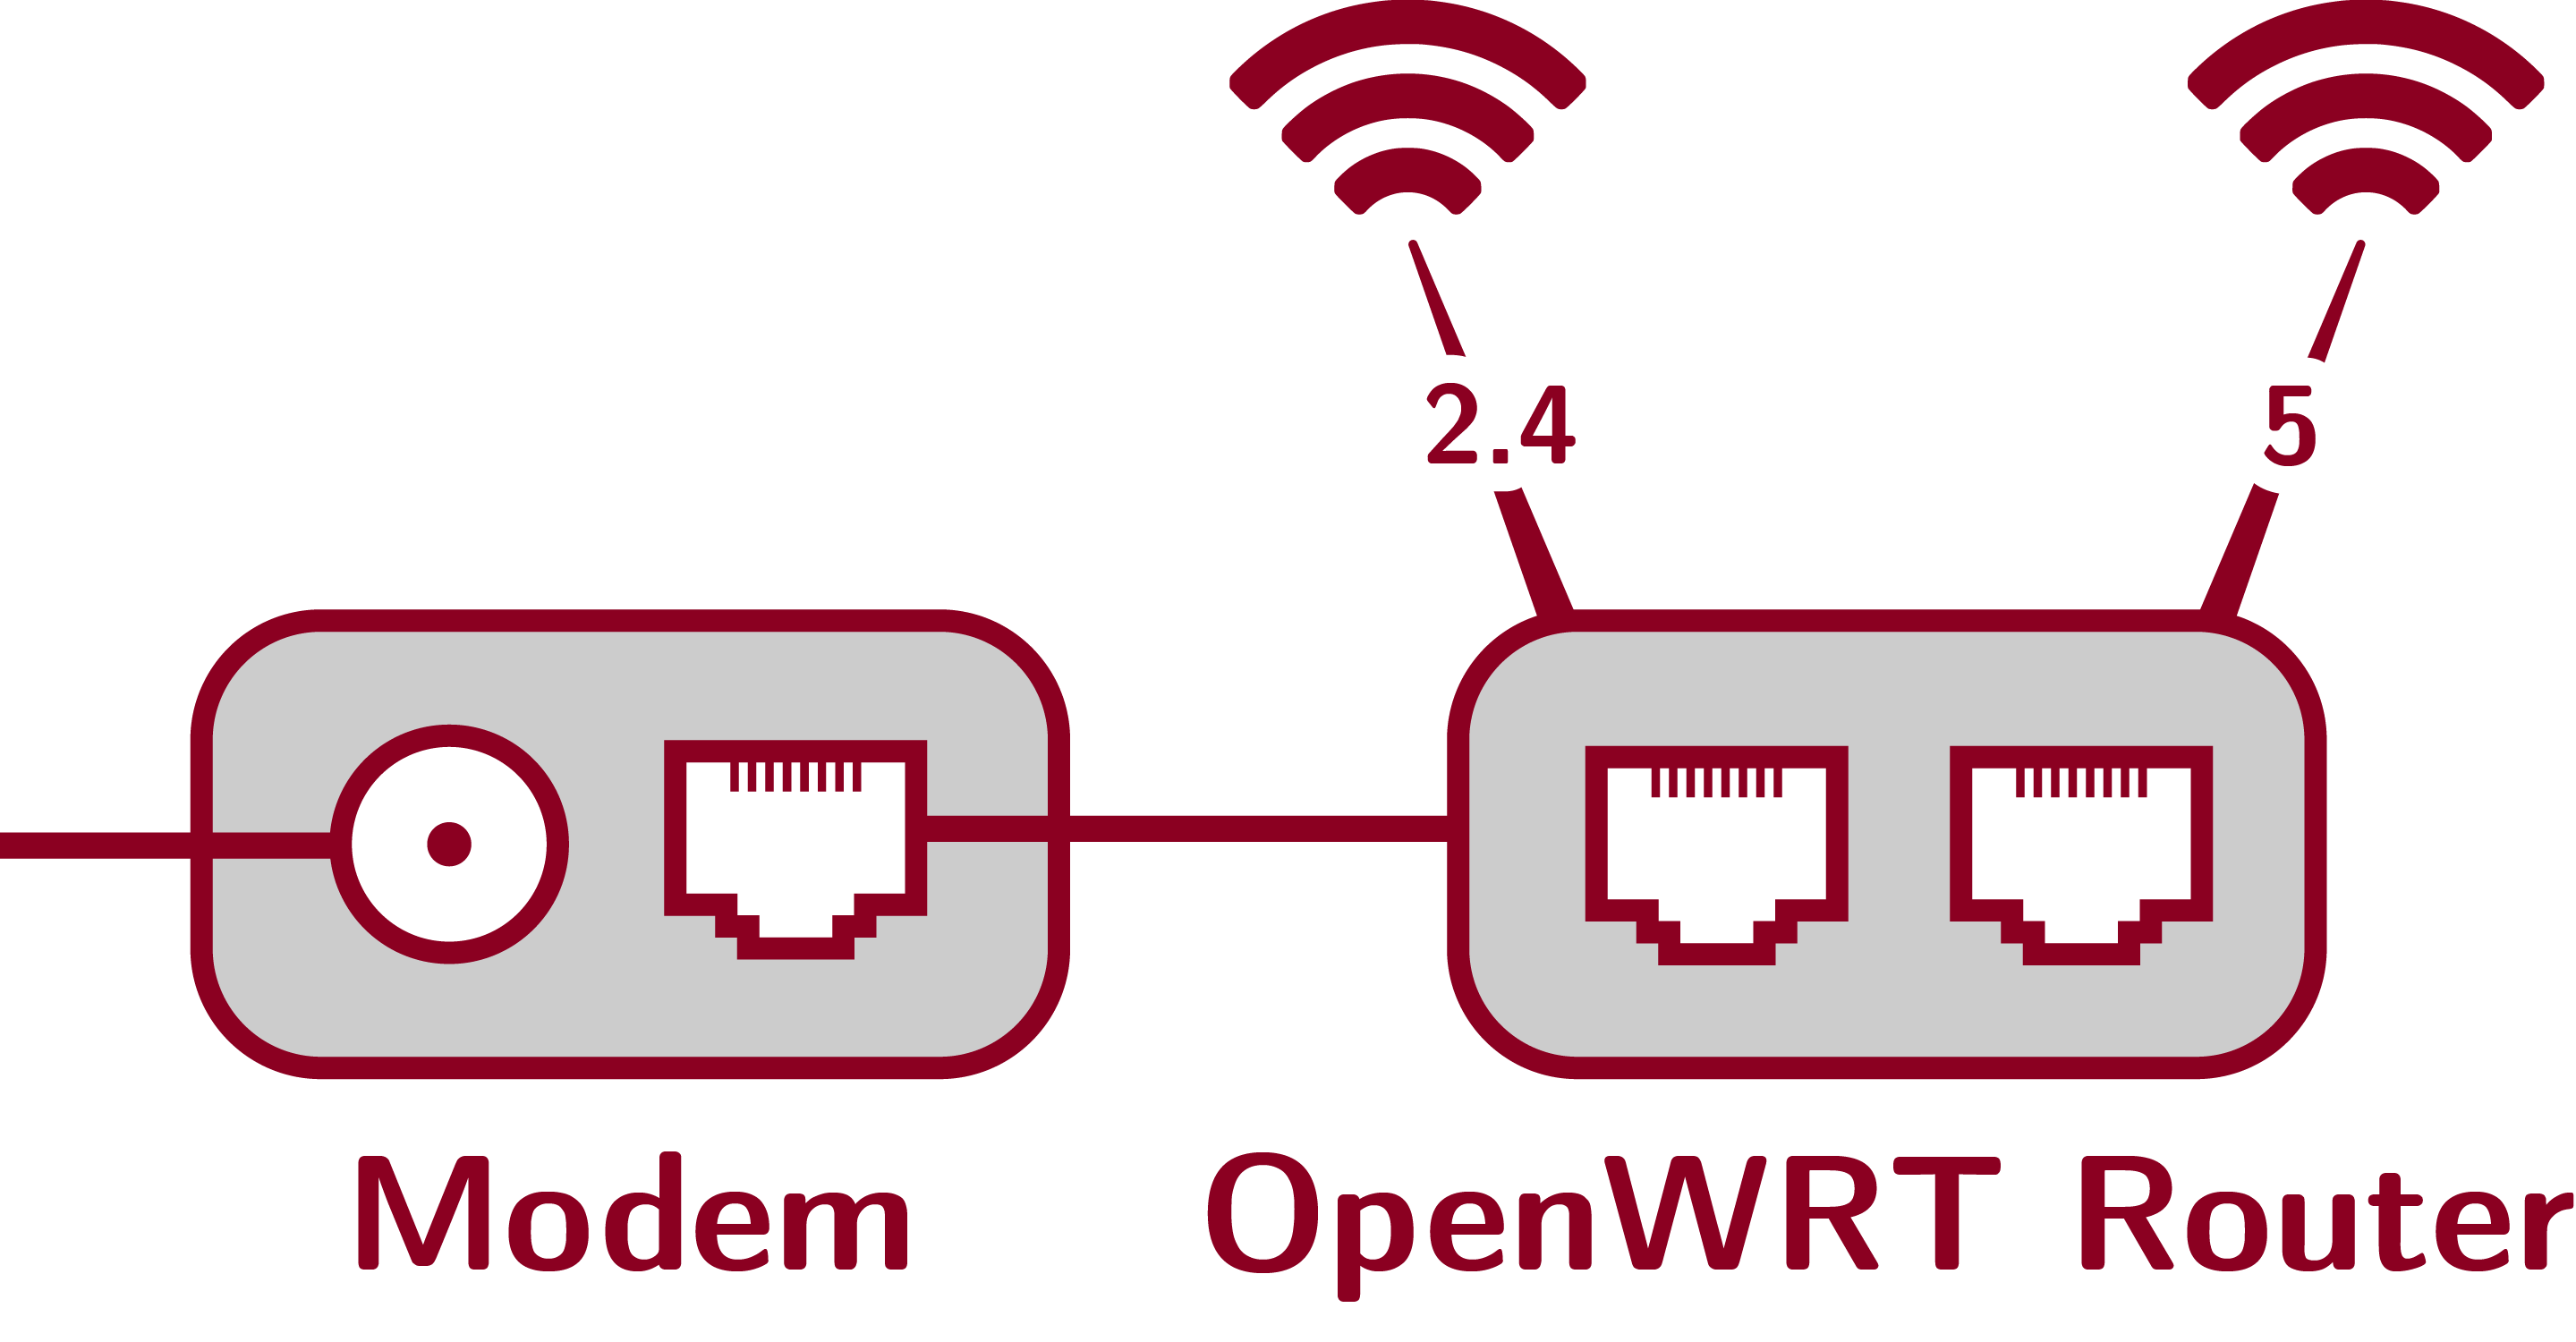
Equipment list and cost. Total cost is around $390. The router is expensive, but it obviates the need for almost all of the other parts.
- Modem: NETGEAR Cable Modem CM500 ($55).
- OpenWRT Router: Turris Omnia ($335). This is a very nice product, but quite expensive. The upside is that is an all-in-one solution. I’m still not completely sure how powerful it is, and how much analysis we can run on it. I ultimately gave up on installing numpy and pandas, which by my count is a big problem.
Technical implementation. Congratulations on your purchase and deep pockets! The Omnia is a great product, but it did take a little bit of configuring. Without setting wider, 40 MHz channels, I was getting unacceptably low bandwidth. The DNS also seriously fell over – nytimes.com, archives.gov – things didn’t load, family complained, dig failed to resolve, and so I forced everything to resolve through Google (sad but true).
At that point, you can log in directly through ssh. The package manager on OpenWRT is opkg. To my surprise, we can install tcpdump but not tshark on the router. The instructions on OpenWRT and other forums all talk about running tcpdump over ssh and either directly piping it into tshark / wireshark on another computer, or downloading dumps. I wasn’t happy with that solution.
But hey – we have direct access to the interfaces, so just inquiring about consumption should be trivial. I tried several methods. First, bmon gives a beautiful “TUI,” but it’s not great for scripting. You get something similar from iftop -i br-lan, and something simpler from just ifconfig.
Ultimately however, I installed and quite liked wrtbwmon. It uses iptables rules and thus has basically no overhead, and can break down consumption by device. Updating those instructions,
-
- Download the package from pyvroski/wrbwmon.
- Untar it and copy the contents to
/opt/wrtbwmon/. - Update
wrtbwmon, changingbinDirandbaseDirto reflect this new location. - Run the
wrtbwmon setupat boot, by adding the lines below to/etc/rc.local
if [ -x /opt/wrtbwmon/wrtbwmon ]; then logger -t 'rc.local' "Starting wrtbwmon setup..." /opt/wrtbwmon/wrtbwmon setup /tmp/usage.db fi - Set up a cron job to run
/opt/wrtbwmon/wrtbwmon update /tmp/usage.dbon a regular interval. The file
/tmp/usage.dbthen contains a listing in the format# mac,ip,iface,in,out,total,first_date,last_datewhich you can sum to get total incoming and outgoing consumption.
Note that if you want bandwidths or consumption per minute, you’ll have to track the differences yourself. I used stat to keep track of accurate time differences, in case cron was delayed or skipped or irregular (as in my settings).
5. Software: arpspoof
The idea of ARP (Address Resolution Protocol) spoofing is to tell the target device that you are the router (that your MAC address is the router’s), and tell the router that you are the target device (that your MAC address is also the device’s). ARP doesn’t have authentication, so each one believes you, and all the data to and from the device passes through you. You can now monitor, modify, or drop that traffic.
Since we want to monitor consumption and not disrupt it, we turn on IP forwarding. This is very efficient: it is built into the kernel.
Strengths and limitations. ARP spoofing is possibly the easiest and cheapest method, There are some concerns about performance, but in my experience video chats were all fine when running through the pi. In this case, the wireless router runs as a router, and we drop the Linksys router and the switch.
One big advantage of this is that it’s easy to turn on after the fact, if you’re already running passive measurements.
Network topology. All you need is a pi hanging off the router, to inject the spoofing and monitor the redirected traffic.
Equipment list and cost. Just the modem, router, and pi. The total cost is around $315. But if you already have a modem and router, all you need is the pi ($80-$120).
Technical implementation. First, sudo apt install dsniff. Then all it takes is turning on IP forwarding:
echo 1 | sudo tee /proc/sys/net/ipv4/ip_forwardand then spoofing both the router about a device and the device about the router.
sudo arpspoof -i eth0 -t 192.168.1.1 192.168.1.9 > /dev/null 2>&1 &
sudo arpspoof -i eth0 -t 192.168.1.9 192.168.1.1 > /dev/null 2>&1 &
The same tshark commands already given will now let you monitor or capture packets.
You can also set up these spoofs yourself, to get better control. Former-NOISE Lab member, Danny Huang, wrote an ARP spoofing package in python, for the IoT inspector project.